Portrait Orientation

Landscape Orientation
So, yesterday I bought a frame for a picture just to know that it won’t fit in the frame due to the portrait orientation of the picture and landscape orientation of the picture frame.
Before I was going to return the frame, I realized why not print the picture in Landscape. If you are here, then you might be facing the same problem. Then don’t worry here I am going to show you how to print a portrait photo in Landscape with many examples.
Table of Contents
Can You Print A Portrait Photo in Landscape?
Yes! You can print a portrait photo in any orientation you want and here I am going to show you how!
How to Print a Portrait Photo in Landscape
To Print a Portrait photo in Landscape, you need to set the orientation to landscape which is set to portrait orientation by-default in the print settings and click on print button.
3 Ways to Print a Portrait in Landscape
There are many ways by which you can print a portrait photo in landscape and the easiest one is to set the orientation of the image from portrait to landscape in the print menu and hit the print button.
Now let’s get into detail about how you can print a portrait in landscape orientation. There are many ways to do that but here we are showing the 3 easiest and most efficient ways to do that. These are given below:
- Set the Orientation to Landscape in Print Settings
- Rotate or Crop the Picture to a specific size or orientation
- Use third-party software like photoshop to edit or change the orientation of the picture
First of all, you need to decide, how you need your photo to be. Whether you want a one-time print or to completely change photo orientation. There are types of photos which need to be in Landscape like wallpapers and nature photography. Though normal photos look better in portrait.
There are many methods with which you can print a portrait in landscape which are explained further below:
Set Orientation to Landscape
The easiest way to print a photo in landscape orientation is to simply select landscape in the orientation panel either in the print menu or any third-party software. In this method, you can directly print a portrait photo into landscape orientation from your printer settings.
I have multiple ways and as I said, it’s the easiest one I came across. All it needs is just on the orientation tab and select landscape. But there is one downside of this method that you might enlarge a photo and if it’s of lower quality, you might come up with a little loss in resolution of the image.
Steps to Print a photo in Landscape
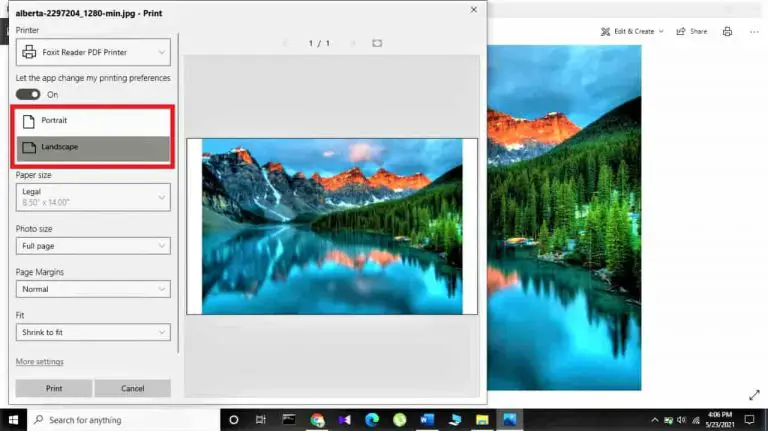
- As shown in the image, click on the photo, click on the print button or simply press “Ctrl + P”.
- The print menu should show up where you can change all the settings according to your choice.
- Now select the Orientation tab and select Landscape which is set to portrait by default.
- Click Print.
- The Image will be printed in landscape.

Sometimes using this setting causes a little disruption and might chop off the head of the picture. For this, you need to change an additional setting in the print menu.
You will find the fit to the screen and set it to shrink to fit which will shrink the picture and it will fit the paper. What it does is that it reduces the size of the image so that it can adjust completely in the paper and can be framed amazingly.
What if This Method Don’t Work
There is a chance that this method won’t work for everyone as settings differ in different operating systems along with different printer settings. However, as far as I have researched about it, this method is going to work.
Still, if it doesn’t work, we have provided a few more ways to do accomplish that.
Crop or Rotate the Photo
If the above method is not working for you or if the picture is not print correctly by directly printing in the landscape without any preview, then you can try some more methods.
The first thing you want to do is to rotate the picture by 90 degrees in the photo editor and look at whether the picture fits into the frame or not. If the image fits into the frame perfectly and you are sure you would get your required result, click the print button and frame your landscape picture.
If the image doesn’t appear perfect by rotating it, then you need to crop the unimportant part of the image and keep important. In this way, you can make a perfect landscape out of a portrait photo.
There are many software and online tools to rotate or crop your images. You can wither your windows own photo editor or any other editor like MS Word or Paint tool etc.
Just right-click on the image and select edit and that’s how you can edit with your favorite tool. After it clicks on rotate and you will get a landscape image. Furthermore, in those settings, you will find a crop function that will let you cut out the insignificant parts of the image.
Remember, the cropping is for cutting out an unnecessary portion of the image. You can use it only when you don’t care about losing some of the fraction of the image. You can’t crop something if it’s important and you need to print the full photo. In that case, you might need some other strategies.
Edit Using Photoshop of Similar Tools
The third method is to change the orientation of the image by using photoshop, Corel-Draw, etc. If you have applied all of the above simple strategies and still not getting the required results, then you should come up with a professional method.
Although you can use simple tools and editors to flip or rotate a landscape if you want more from the picture, then you would need photoshop or any other tool like it.
With photoshop you can edit your photo according to your choice and need. You can greatly enhance the crispiness and colors of the scene and so your landscape is going to look more appealing and eye-catching.
By using a more advanced application like photoshop, you can have more options to enhance the image. This software also allows you to create multiple layers and professionally edit images and also its quality is retained too.
Okay! I understand, photoshop is not an easy thing for beginners but it’s not that tough too. You can learn Adobe Photoshop freely from YouTube videos. Here we will share the link.
What to Use if Photoshop is Not Available
Photoshop is our most preferred tool for photo editing, but we understand that photoshop is not something that is accessible to everyone. Photoshop is a paid tool and not everyone can afford it. It is for someone who uses it regularly, not for people who just need editing occasionally.
Many applications offer most of the photoshop features for free. These applications include GIMP, Photopea, Pixlr. These are free software that is available for all, Windows, Linux, and Mac.
These programs also have a paid version but for a beginner, you don’t need that, and free versions can work fine. You can upgrade to the premium version if you want to be professional or if you have to work more often.
Though the paid version of these tools is much cheaper than Photoshop. Also, these tools provide free trials which are really helpful, and you can experience whether these tools are helpful or not. The Pixlr can also be used on Android Phones.
How to Print a Photo in Portrait
It is not always necessary to print the photo in landscape. It’s needed mostly when you want to print a scenery or relatable landscape pictures. It depends on the type of picture.
If you are just taking pictures of yourself or portrait pictures with bokeh effect, then you don’t need to print in landscape. Those type of photos are best when printed in portrait orientation. You can get all the crisp and bokeh of the background more enhanced in portrait orientation.
To print a portrait photo, you just need to open print settings by pressing Ctrl + P and select portrait orientation which is set as default and click the print button.
If you are taking portrait photos, wide-angle photos, selfies with your phone or camera, then these photos need to be in portrait orientation as they would look quite weird in landscape orientation.
Final Verdict
So, here we let’s rewind what we discussed before in the post. To print a portrait photo in Landscape you need to change the orientation of the picture from portrait to landscape but this setting depend on the picture and you need to edit the photo better in an editor or photoshop.
Here we showed you three of the easiest ways to print the portrait photo in a Landscape orientation. Also, we have researched for many days about the differences between telephoto vs zoom lens, give a read to that for sure.

