If you are new to the field of photography, then this post is going to be very helpful for you and here we are going to show you some unique and professional techniques to boost your photography skills.
Take a look of this blog and practice the steps properly. Here we will show you the best steps of boost your photography skills. By following these steps you will not only master DSLR Photography but also Mobile Photography.
Table of Contents
Steps to Boost Your Photography Skills
1. Take control of focus
Generally if you are not very good in setting focus, then leave your camera on auto-focus. It will focus the object using the central point focus and may take sharp pictures in many situations. For a lot of inventive photography it’s required to take control on the focus. Your chosen subject will not every time in the center of the frame and at a specific place after all, so you would need control on focus.
So the 1st talent you wish to master is a way to get your camera to target things precisely so you can take sharp and detailed objects. Your camera includes a variety of focus points unfold across the frame – you’ll see them through the view-finder and this supply a superb solution for specializing in manual focus.
The most accurate procedure for choosing focus points varies in step with your camera, however usually in Canon models you have got to press the AF point-selection button, then rotate the input dial or take the use of the selector on the rear camera. Look around the view-finder as you are doing, and so you may see the active AF purpose (in red) moving around the frame.
On most Nikon DSLRs, once you’ve got hand-picked single-point optical device, you just use the four-way controller on the rear of the camera to spotlight a special AF purpose.
The main drawback to use the outer focus points on many cameras is that they are not as sensitive as those within the inner center of the frame. This suggests that they’ll struggle to focus in low light if the subject is in low contrast otherwise you are using a lens with an aperture of f/5.6 or narrower. You will additionally realize that there’s not a focus point precisely wherever you would like the camera to focus.
In each case you’ll manually focus the lens, or use a method referred to as focus lock, wherever you highlight the topic with the active AF purpose so half-press the shutter unleash to lock the main target distance before reframing the shot.
2. Focus on moving subjects
Focusing on a static object is all well, however, not everything can wait with patience for you whereas you compose and capture your shot. Not every time you will get a static object to focus. For this reason, you would like to master the art of focusing moving subjects.
To do this, modify the auto focus from Single Shot (Nikon) or One-Sot (Canon) to Continuous or AI (Artificial Intelligence) Servo mode. Now, once you have your target locked by half-pressing the shutter-release button, the camera can still refocus because the subject moves. Till mastering it you can use autofocus to take your photos.
You can select from all of the main focus points for eccentric subjects, however once shooting in a low-light and low-contrast subjects, or if testing lenses with aperture narrower than f/5.6, you may notice that these outer points will struggle to focus on object.
When it involves mastering focus, you furthermore might need to grasp the reason of why your shots are not sharp? This will be all the way down to focusing; however, it should even be because of camera shake or the object moving. All you need is to identify the cause, fix the matter, and then try once more.
- Incorrect focusing: If the photos have softness because of incorrect focusing, you will realize that areas at the front or behind the object are sharp. If you cannot see any sharp areas, incorrect focusing can provide a uniform blur all around every space of the image.
- Movement: You’ll simply spot blur effect caused by shaking of camera by the characteristic ‘streaking’ of highlighted areas. These indicate that the camera or presumably the subject has moved continuously to some point throughout the exposure.
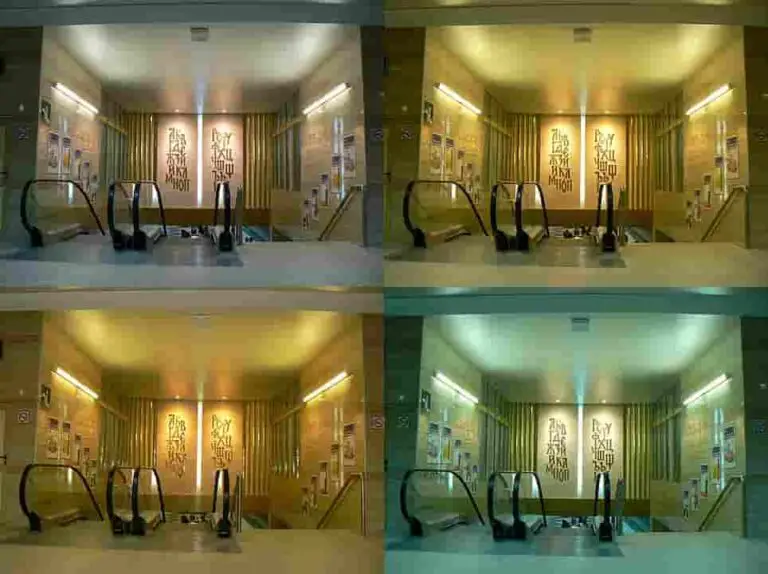
3. Get white balance right
Camera settings are very complicated and you might forget the setting to adjust the proper white balance – particularly if you shoot in raw, as then you’ll be able to amend it after you process your pictures later. However, you’ll have to induce the proper white balance in-camera to be ready to assess the exposure and colors of your shots and get the most effective results.
Auto White-Balance settings of your camera will typically do reasonably smart job of capturing colors properly in most lighting conditions, however, it is not inerrant.
The main state of affairs within which you will get higher results by mistreatment one among the manual planned values is once your subject is dominated by one color or tone, like a sky, orange sunset, or perhaps an oversized expanse of inexperienced grass.
In these things Auto White Balance will set a settings to counteract this robust color, thus you’ll improve results by choosing a white balance setting that suits the lighting conditions, like daylight, warm or cool.
The actual white balance of the sunshine at sunrise or sunset is on the point of the wolfram/tungsten or artificial lightweight setting (3,200K). However, if you set this plan you’ll lose a lot of the warmth that you simply need to capture in your shot and photos will be cool. Instead, attempt setting the white balance to sunlight, or perhaps Cloudy, to capture the orange glow making it more beautiful.
4. Set a custom white balance
Take a picture of a white or a grey object which fills the entire frame and is in the position of the object you want to take picture 0f. The object can be anything. We would recommend a piece of card for this purpose. Then configure the camera’s manual white-balance settings according this present white-balance setting.
5. Master Exposure
Mastering the exposure adjustment of your shots is very important if you want to be a professional. Deciding whether or not to increase or decrease the exposure of your shot may be puzzling, because the adjustment you wish to form is sometimes not what you might expect. Here’s the way to use your camera’s Exposure Setting to lighten or darken your image.
If the object contains mainly lighter tones, then you will notice that your cameras will take under-expose your images. Therefore, you wish to press and hold the Exposure Compensation button, increase the exposure by turning the dial right to enter a number of 1, and then take the shot once more.
If shooting a in the main dark subject, your camera is probably going to over-expose the scene, therefore you will got to scale back the exposure. Press and hold the Exposure Compensation button as before, however this point flip the dial left to enter a number of -1.
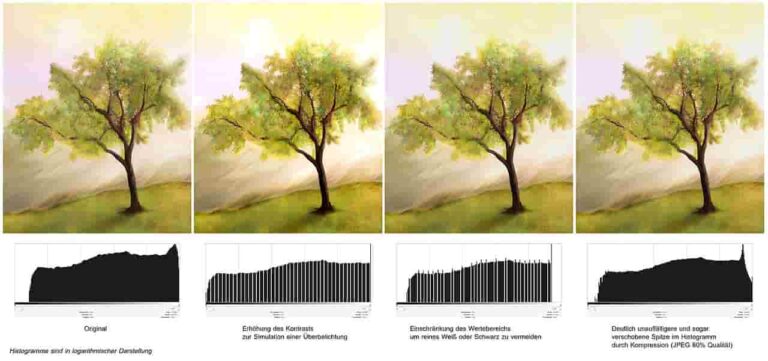
6. Decipher the Histogram
The most convenient way of checking the exposure in your shots is to use the bar chart show also known as histogram on your camera’s rear screen once when you take your pictures.
This determines the distribution of light as you take the pictures. To get more use from this tool you wish to acknowledge the characteristics of under-exposed and over-exposed photos. If there’s a gap available to the left of the histogram, and also the graph bangs the right-hand side, then it means that the image is over-exposed and vice versa.
7. Deal with high-contrast lighting
Using your DSLR’s Exposure Controller to regulate the general exposure is okay for several situations, however, there are times when the exposure varies and is sometimes too large for camera to capture, both shadows and exposure.
This is called camera’s dynamic range, and whereas it will range between completely different models, it’s absolutely common to seek out scenes wherever the distinction is larger which even the best cameras will address.
When you practice, you will be ready to cop with these conditions before you begin shooting, however, the easiest way of spotting condition is by reviewing your shot and checking the histogram, and exposure/highlight warnings.
You can start by taking a test-shot and checking that the shadows reach the left of the graph. You’ll be able to currently activate the highlight warning. If the display blinks showing that there are no highlights with detail, then your camera cannot record the full brightness.
When you are long-faced with this kind of issue, there is a variety of solutions of how to overcome these problems. If you’re shooting in JPEG mode, several cameras provide integrated systems to capture additional highlight and shadow detail than typical camera pics. The Nikon system is termed as Active D-lighting, whereas the Canon version is Auto-Lighting Optimizer.
8. Try an ND grad lens filter
The answer for handling high-contrast lighting is to use an ND Grad-lens filter. These filters area unit partially dark and partially clear, therefore you position the dark space of the filter to scale back the brightness of the most exposed area of the scene.
This solution is fine wherever an oversized area of the scene is brighter than the rest, like the sky in open landscape, but they’re less helpful for subjects containing smaller bright areas, like windows or daylight through trees, as it will result in darkening of the areas around these highlights too.
9. Create HDR images
High Dynamic Range which is known as HDR has become a significant feature for taking photos that would have burnt-out exposure, having no shadow detail, or both.
At least three shots are required to achieve HDR shots. One of which should be under-exposed, one should be over-exposed and the one should be correctly exposed version of your picture. After this the three versions are combined into one dynamic version called HDR version of picture. These can be merged either by the help of Photoshop or other tools like Merge to HDR and Adobe Lightroom and HDR Efex and Photometrix etc.
11. Recover detail
If you are trying to catch more highlight and shadow details than JPEG mode then you definitely need to shift to RAW mode. It is easier to recover more details from the shadows even more than the highlight. Therefore when you are shooting objects of high contrast then, you should set the highlight, so that you recover as much light as possible to capture the details. Mastering to capture details is one of the key steps to boost your photography skills.
12. Position your subject
Selection of objects to take pics of and the settings of your camera is as much important but besides selecting what to shoot and settings to use, learning the fundamentals of composition is one of basic steps to boost your photography skills. There are lots of rules and theories regarding what make the right composition, however, the key issue is that you need to keep in mind, where to position your object when taking your photos.
It’s better to place the object within the center of the frame; however this could make static compositions. It’s typically far better to place the object simply off-center.
The classic approach is to use the rule of thirds, which is outlined by unreal ‘lines’ that divide both sides of the image into 3 equal-sized areas. You then position the main object on one in each of these lines, or wherever they intersect each other.

13. Make good use of space
The area around your object is almost as vital to the success of your composition because of the subject itself. First of all, you would need to think about how much area surrounding your object are you going to include in your photo.
This isn’t a very necessary; however as a general rule, it’s better to include the surrounding if they augment the image, like showing the surroundings round the subject during a portrait or life image. As an alternative, a tighter composition that excludes the environment will facilitate the creation of the image dominant subject.
One of the main reasons of using surrounding area in your shots is especially applicable to action shots and portraits. When you look at pictures of moving subjects, you unintentionally look ahead into the object that is moving towards.
Therefore it’s better to leave extra space before the object for it to maneuver into than there’s behind it, otherwise, your shot will find yourself trying rather unbalanced.
Portraits can also take advantage of Similar-Composition technique. If you let some space around your object, then it creates a more balanced photo.
14. Sharpen your shots
It takes a lot of time to master the skill of taking the most perfect photos. It’s tempting to assume that more the sharpening you apply to your pictures, the sharper they will look. However you would like to practice some modes; otherwise, you may end-up with more noise and ugly ‘haloes’.
One of the common factors causing over-sharpening is applying it at the incorrect stage in your picture, or perhaps applying it to photographs that have already been sharpened. If you shoot JPEG pictures, these pics may have been already been sharpened in-camera, therefore it doesn’t require more sharpening and you need to take care of it if you are applying more sharpness.
The most appropriate way to avoid over-sharpening is to leave it as the last change or adjustment to your pics. Thus if you’re going to edit your shots in Photoshop or some other editor, then it is best to off the sharpening in camera.
One of the most common drawbacks of applying an excessive amount of sharpening could be a halo around details in your photos. To identify this, focus zoom to 100% on a particular spot in the image containing dark lines or fine details against a lighter background or light lines against dark background.
Here’s an excellent tip: if applying sharpening to your pictures when editing with Photoshop’s dull Mask filter, the key’s to be delicate. At the beginning use a quantity of between 50% – 80%, a Radius of one, and a Threshold between 2 and 5.

14. Use saturation
Saturation is also one of the most important factors which add to the beauty of the pictures. Without saturation the image seems dull. Just like sharpening saturation also needs to be dealt with care, so that the image doesn’t appear over-cooked or over-saturated.
In many cases you may find that some colors are more saturated than others, more commonly green and red colors. Therefore you can also adjust individual colors by using Hue control rather than changing the whole saturation of the photo. Saturating a photo increases its beauty and provides vivid photos especially when taking shots of greenery and landscapes.

Conclusion
Here we can conclude our post and hope that you will practice the above steps to boost your photography skills and will prove you to be our best students. You can further evolve your photography skills by using quality lenses. Thank You
